Outboard shaft length and transoms to fit.
from: http://www.suzukimarine.co.za/technical/technical-faq-motor-specifications/
If you are building or rigging your first outboard powered boat, you may be confused by shaft length, transom heights and ideal vertical location of your outboard. This document will try to clarify those subjects.
We will discuss 3 related items:
- Shaft length: what is it? How do you measure it and what are the industry standards
- How to select the proper shaft length
- How to adjust your transom to fit the outboard if necessary
Shaft length:

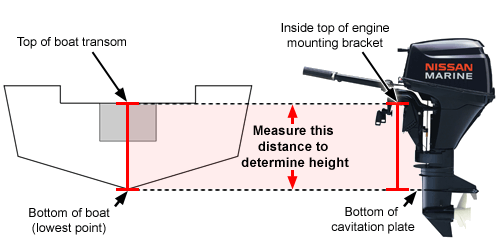
The shaft length announced by the outboard manufacturer is the vertical distance between the inside of the clamp and the cavitation plate.
( We will not argue about names here but the proper name for the cavitation plate is antiventilation plate).
Shaft lengths come in multiples of 5″ (127 mm). Beware of names like short, long, normal shaft etc. Most will call a 15″ standard, the 20″ long shaft and 25″ extra-long but boaters do not always agree on those names. Use figures and measure your shaft please, no confusion is possible with figures.
Standard shaft lengths are 15, 20 and 25″ (38, 50 and 63 cm). Those shaft lengths are an industry standard but there are exceptions. For mid range engines, the most common shaft length is 20″ (508 mm). 15″ shafts should be reserved to protected waters. 25″ shaft are rare below 100 HP. Other shaft lengths exist.
Many small engines, 10HP or less have shafts around 17.5″ long (45 cm). Outboards sold for sailboat propulsion often have an unusual long shaft for their size. Very large engines, 250 HP or more, can have 30″ long shafts. (from here, I switch to inches only as units. 1″ = 2.5 cm).
Select the correct shaft length:
When selecting a shaft length, we must start with the location of the prop or more exactly, the height of the cavitation plate.
From there, we will know which type of shaft length to install or, if we build/modify the boat, decide how high the transom clamping board will be. 
Most planing boats will work better with the cavitation plate flush with the bottom of the boat or a little bit above: 1/2″ is common.
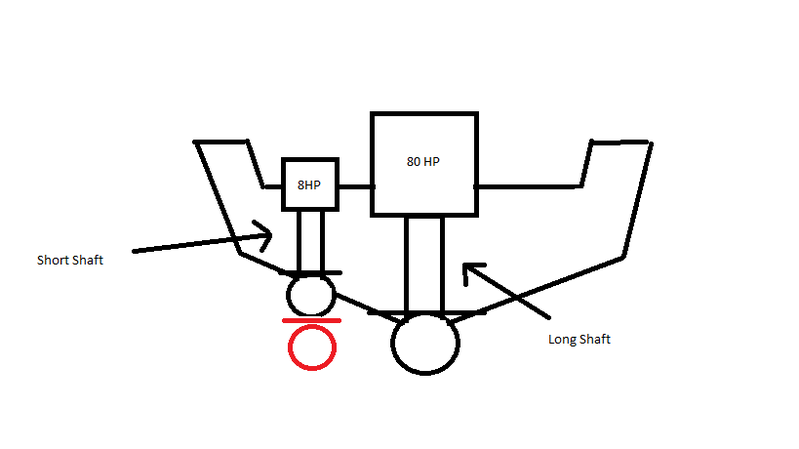
Slower boats like work boats or displacement hulls need the prop to be lower not only for better “bite” in the water but to avoid aeration when the boat pitches (hobby horse . . )The cavitation plate of a small dinghy outboard is often 2 or 3″ below the bottom. Same for sailboats auxiliary outboards and most other displacement hulls. This creates a little more drag but that is almost irrelevant at those speeds.

Note that we have not looked at the water line: our outboard prop depth is set in relationship to the hull bottom, not the waterline (power boats).
A special case is an outboard on a bracket. At speed, the prop runs in a hump behind the hull and the bracketed outboard can have it’s cavitation plate 2″ higher than the bottom of the boat. The bracket manufacturer will recommend the outboard height according to the bracket shape and length.
As a yacht designer and boater, I prefer longer shafts. It is unsafe to have the engine block too close to the water on a low transom. Plus, a low transom cut is an invitation for the water to flood the boat. There are many reported cases of boats that sunk flooded through the transom motor well cut. The boat can be swamped by it’s own wake when coming off plane or going in reverse. If the engine needs service at sea, the block will be exposed to the water especially with some crew members all standing in the stern arguing about spark plugs and fuel filters.
This is so clear that the USCG and ABYC penalize a low cut transom in their capacity calculation formulas.
To prevent flooding, all my designs except small dinghies, include a high bulkhead in front of the motor well but even with that bulkhead, let’s use a longer shaft if possible. For small boats that can not be fitted with that bulkhead, I recommend to fill the space under the stern seat with buoyancy foam.
In the next paragraph, we will see how the height of the outboard can be adjusted by customizing the transom shape and moving the clamp bolts.
Adjusting the transom height:
This applies only to those who built their own boat or completely rebuild an existing transom.
All other have no choice about transom heights and must install an engine that fits the existing transom but if you build the transom, you can set or change the height of the clamping board.

Vertical heights and angled lengths: the difference between the vertical height and it’s projection is small and can be disregarded when cutting the plywood. That small difference gives us a nice gap for the thickness of the fiberglass. Let’s use a large size outboard powered boat with a motor well as an example. The transom is designed for a 25″ shaft.

If you want to install a 30″ shaft, the cut at the clamping board level must be raised by 5″. That’s all, very simple.
You can also raise the bottom of the motorwell but keep the same depth inside as a minimum.
If you do not raise the bottom of the well, check for interference with the mounting bolts. We don’t want one of them to hit that bottom panel.
To install a 20″ shaft, we do the opposite: cut the transom 5″ deeper at the clamp and lower the motor well bottom panel.
Dinghies and other small boats rarely have a motor well. The height can be set by drawing some nice curves at the top of the transom.
As designed, the transoms of those boats will accept the most common shaft lengths but it is easy to adjust the height.
\ 
Note how we use curves. The curved corners are stronger and better looking. The original camber at the top is almost always shown on the plans. Use it to draw the other curves and round the other intersections with the same wide radius, in this case 6″ (15 cm).
In small boats, there will often be a stern seat or deck that is part of the structure and can not be removed. Check the location of the clamp wing nuts and if necessary, cut an opening through that rear seat.

Also found these drawings – maybe they help ?


